

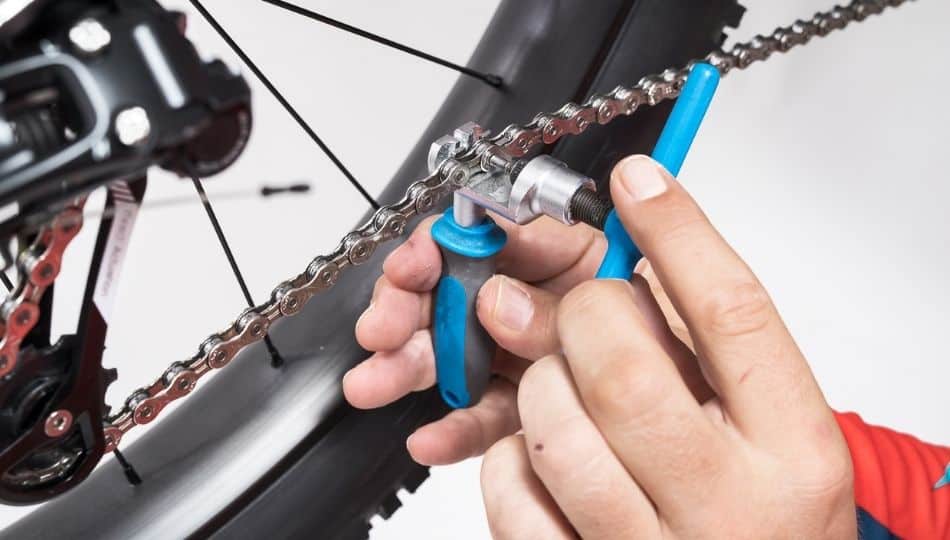
When your bicycle chain needs replacing, removing or cleaning, you may be looking to break it without the need for any special tools. It’s handy to know if you ever need to break your chain and don’t have the specific tool around at the time, (or simply don’t want to purchase one), that it is possible to do.
A bicycle’s chain can be broken by carefully mounting the bike onto a stand and then opening the master link on the chain. The chain can be broken by using a specific bike chain removal tool, but it can also be done using other DIY tools such as pliers, chisel, & a hammer.
This article will provide a detailed guide on how to break a chain without any tools. But first, you need to remove the chain from your bike and find out if it has worn out. Check out the steps below!
How to Break a Chain without a Tool
Firstly, you need to remove the chain from the bike. Once the chain is out, you can now break it.
Removing the Chain
You can remove the chain safely with some stages. First, you have to remove the chain from your bike. Do that with the steps given below.
Step 1: Determine whether you need to replace the bike chain or not:
Check if your chain has worn out by counting out the 12 links and measuring all the pins in the chain. If the distance between the pins is more than 12 inches, then you need to replace the chain. This increase in length means that the chain has worn out.
Step 2: Mount your bike on the stand:
You’ll need to mount the bike on the stand. You can also turn it upside down and place it against a firm surface. This way, you’ll be able to work on the chain efficiently.
Step 3: Clean the chain:
The chain accumulates lots of dust and debris while you ride your bike. So, you might want to clean it first before breaking it. If the chain is greasy, use an excellent biodegradable chain cleaner to dissolve and get rid of any grease or oil. Once you do this, locating the primary link and handling the chain will become easier.
Step 4: Locate the master link:
You should know that your bike’s chain may not possess this master link. But if it does, you can find it easily. Look out for a slightly lighter or darker link. Once you see it, you’ve found the master link.
Step 5: Rotate your bike’s pedals until the master link is in the middle of the back and front gears:
Rotating the master link to the middle of the back and front gears will help you access it faster. In some cases, you may find out that your bike does not have a master link. If this applies to you, you should break the chain through any of the links.
Step 6: Open the chain’s master link, slide it out and keep it aside:
You can open the master link in different ways depending on its design. Some come with a swivel to enable the pin to slide off, while you’ll have to flex others to open them up. While some master links are disposable, it is important to keep them safe. This way, you won’t lose it, and you’ll save yourself the time and money needed to get a new one.
How to Shorten the Bicycle Chain

Shortening the chain is easy. Once you’ve opened the master link, you’ll now follow the steps below to shorten the chain.
Step 1: Decide the number of links to cut off:
While determining the number of links that need to be cut off, you must keep in mind that it is easier to take the links off than to fix them back together. It can take up to an hour to fix the links together again. Most times, this task requires a professional.
Step 2: Clamp the next link:
Begin from the last chain in the part that is not attached to the master link. Keep the link at a fixed position. If your chain does not have a master link, you can use any link at all for this purpose.
Step 3: Push the pin almost all the way out:
At this stage, you will require pliers, a hammer, and a thin nail. Place the chain of above the socket and use a hammer to strike the nail. When you do this, the pin will go through the holes. The pliers have a part that is used for cutting wires. The reverse part is concave and you can place the chain over it and hit it with your hammer and a nail. Once you’re done, you can put it back.
Step 4: Repeat the same for the next pin:
Once you finish disassembling the first pin, you must proceed to disassemble the next one. At this stage, you have to repeat the previous process. Put the chain on the socket and use your hammer to hit it firmly. You will notice that the other pain is no longer attached to the chain. Be careful while disassembling the links. It is wise not to disassemble more than two links at a time. This way, you will be able to prevent the chain from becoming too short.
Step 5: Remove the other additional links to shorten the chain:
Sometimes after removing a couple of links, the change will still be too long. In this case, you must remove more links to make it work. However, be careful, so you don’t make the change to short. If the change becomes too short because you removed so many links, it may break while you’re riding your bike. And this can cause an accident.
How to Reassemble the Bicycle Chain
Step 1: Place the master link on both sides of the chain:
To do this, you will need a screwdriver or pliers. Push the links together till they make a click sound. Some chains come with a unique pin or a disposable master link. If this applies to your bike, you will need to purchase a replacement part before you can reattach the chain. Special pins are often available in two parts. However, it is advisable to check out the instructions for your bike’s model.
Step 2: Reconnect the chain:
At this stage, you will have to put the two links together again and then use pliers or a screwdriver to reconnect the chain.
Step 3: Loosen the chain:
Sometimes you may notice that the chain is too tight. Or, the links may be too stiff after you connected them. In this case, you will need to loosen the chain. You can do it by putting the link to the slots and tightening it till it gets to the pin.
Step 4: Apply lubricant:
Try not to neglect this step as it can prevent damages that could ruin your chain. You need to improve the rotation of your chain by applying a high-quality lubricant. When you do this, your chain will become more flexible, and the lifespan will increase. Applying lubricants will also improve the shifting performance of your bike and reduce the wearing on the derailleur, assemblies, and cogs.
These steps may not seem very easy at first, but by making an effort into understanding them, you’ll be able to perform them smoothly. Just follow the guidelines above to break the chain. Be sure that if you follow all the aforementioned steps strictly, you will get a good result in the end.