
When it comes to bike safety, it’s always a good idea to know when each component on your bike is wearing out and needs replacing. And the bicycle chainset (also known as chainrings or drivetrain) is one such component that you should keep an eye on and replace when necessary.
Your bicycle chainset (also known as chainrings or drivetrain) needs replacing when the teeth of the ring are bent, rounded, or flattened or you’re finding it difficult to shift from ring to ring. Replacement of this part is important when worn out to ensure safe riding.
Not replacing your chainset when you see these signs can result in the chain coming off the bike. This puts you at risk of getting hurt quite badly in the middle of a ride. Below i’ll go into more detail about when exactly you should be replacing the chainset and how to go about it, so you can keep yourself secure when cycling around town.
When Should You Replace The Chainset?
To understand when to replace the chainset, it’s also important to recognize there are a few other components to consider. There is the chain itself as well as the cassette. These parts will factor into how often you’ll want to be replacing the chainset.
When To Replace The Chain
As a general rule, you’ll want to be replacing the chain every 2,000 miles you travel. That number will be reduced further depending on how often you’re biking, the distance, and terrain.
Replacing the chain around those times is important, because a worn down chain would mean extra wear and tear on the chainset. So having the chain in good condition will ensure that your chainset will last longer.
There are a few ways to test the chain as well to determine when to precisely change it.
First is the ruler test:
- Take a standard ruler and start to measure the chain. Every modern chain made today has rivets every half-inch. You’ll be using your ruler to measure one rivet to another one that is 12 inches away.
- To do this, start by drawing the chain taut and align the ruler at the zero-inch mark with the middle of the first rivet.
- From there, you’ll need to note where the 12 inch mark lines up.
- If it’s dead center on the rivet, the chain is in great condition.
- If it’s less than a 1/16 of an inch ahead of the 12 inch mark, then the chain is showing some wear but is still good.
- If it’s more than that, it’s time to replace the chain.
Another test to consider is the drop-in style chain checking tool, (here’s an example of one on Amazon). Using this will tell you immediately whether you bike chain is worn out or not.
When to Replace Cassettes
Cassettes on the other hand should be replaced a little more often than the chainset, though it depends on what kind of chainset you have. Cassette sprockets are made of hardened steel which will last longer, while your chainset will be made of a softer alloy. If you’re getting a chainset that has higher grade metal, it’ll last about as long as cassettes will.
Signs your Bike Chainset Needs Replacing
Seeing signs of the chain and casette wearing down could be an indicator of replacing a chainset, but ultimately, replacing the chainset relies mostly on feel.
There is no clear precise time for when to replace them. The reason for that is that there are too many variables that contribute to the wear and tear of chainsets – like riding conditions, the lube that you’re using, how often you’re maintaining it and even your riding shift patterns.


But here are some suggestions on what to look for when checking your chainsets wear:
- One suggestion is replacing the chainset, cassette and the chain altogether whenever one – likely the chain – will need to be replaced. This advice comes from Shimano’s Ben Hillsdon who believes this strategy will ensure that a new chain isn’t being run on worn down gears. By keeping the worn down gears with the new chain, you risk not having the precise shifting that you’d be expecting when you replace the chain.
But that doesn’t necessarily mean the chainset is bad or needs to be replaced. Rather, it’s important for you to be checking out the health and performance of those components as soon as a new one is installed.
- Going back to feel, a sign that you definitely need to replace the chainset is when the teeth are shaped differently or you’re experiencing the chain skipping are signs that a cassette needs to be replaced. By then you might need to replace the chainset then and there based on what’s mentioned above.
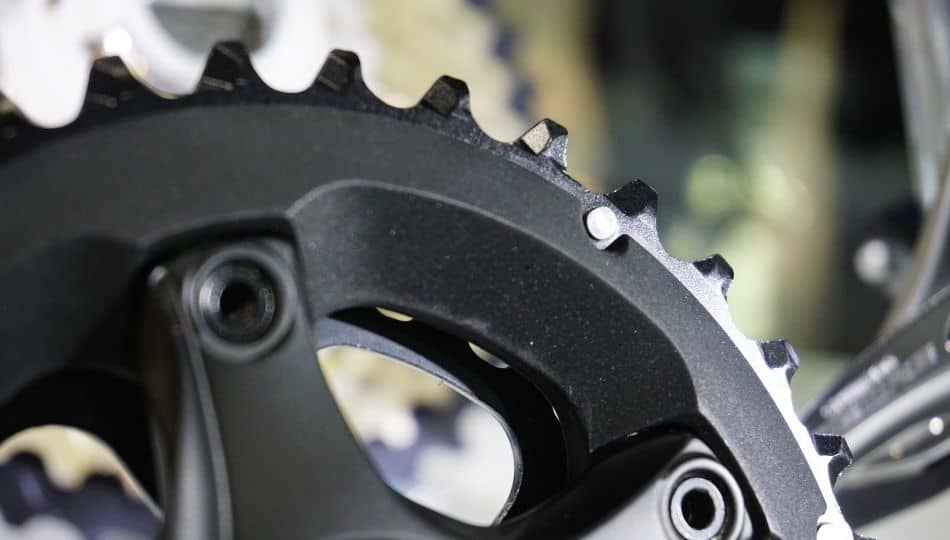
- In terms of the chainrings themselves you’ll start to hear them getting noisier when running or it’s rough when biking. This is very difficult to spot since the teeth on the chainset will slowly take the shape of a shark’s fin after some use.
- Another way of checking is based on sight. If you see daylight between the teeth and a new chain, then the chainrings are likely worn down and need to be replaced.
How To Replace Cassettes & Chainsets
Putting on a new chain on a bike is a relatively simple process. Ensure that the chain is tight, that it slips into the teeth fine, that it’s lubed up and you’re good to go. However, replacing cassettes and chainsets is not done as often. So for a refresher, here is how to replace these two parts of the bike.
Replacing A Cassette
Putting a new cassette in is not that difficult, but requires some special tools to make it work. You’ll need a chain whip or cassette pliers to hold the cassette and a lockring tool. There are two main types of lockring tools. One is from Shimano/SRAM and the other from Campagnolo. Both of them are a touch different so you’ll want to make sure you’ve got the right one. Which one you get depends on what brand of cassette you’re getting. (Amazon sell a set here, with all the tools I just mentioned).
Once you have what you need, follow these steps:
- With the wheel on the floor and at your feet, wrap the chain whip around a cog. Pick a cog that allows you to wrap the entire length of the chain around it.
- Hold the chain whip in place and then push downward. This should be done with your left hand while your right is turning the lockring tool counter-clockwise to loosen it.
- The cassette should slide off after removing the lockring tool by this point.
- In the event if didn’t, chances are the cassette has groove out the splines on the freehub body. A tap from a soft mallet in the opposite direction should do the trick.
Replacing A Chainset
When replacing a chainset it’s more like replacing the chainrings themselves. Here is a 6 step process to help you with replacing.
- First remove the chainset and locate the chainring bolts on the crank.
- Second, loosen the bolts. You’ll need a 4mm Allen key to remove them and these will be tight. If they’re really stuck, give them a quick blast of silicone spray and dry film lubricant to loosen them up.
- Third, remove the rings. From there you can clean them or replace them with new ones.
- Fourth, clean and grease the bolts. Before putting the rings back in, give them a coat of decent-quality fresh grease. Do this for the boltholes too. This will prevent seizing and drying out too.
- Fifth, check the chainring for an alignment arrow which indicates where it needs to line up with the crank. Alternatively you can use the chain pip as a guide. The chain pip is a small grommet that’s meant to stop the chain from getting stuck if it slips off the big ring.
- Lastly, put it all back together again. You’ll need a torque wrench to ensure they’re in tightly. You can check if it’s tightened enough based on the torque wrenching clicking.