
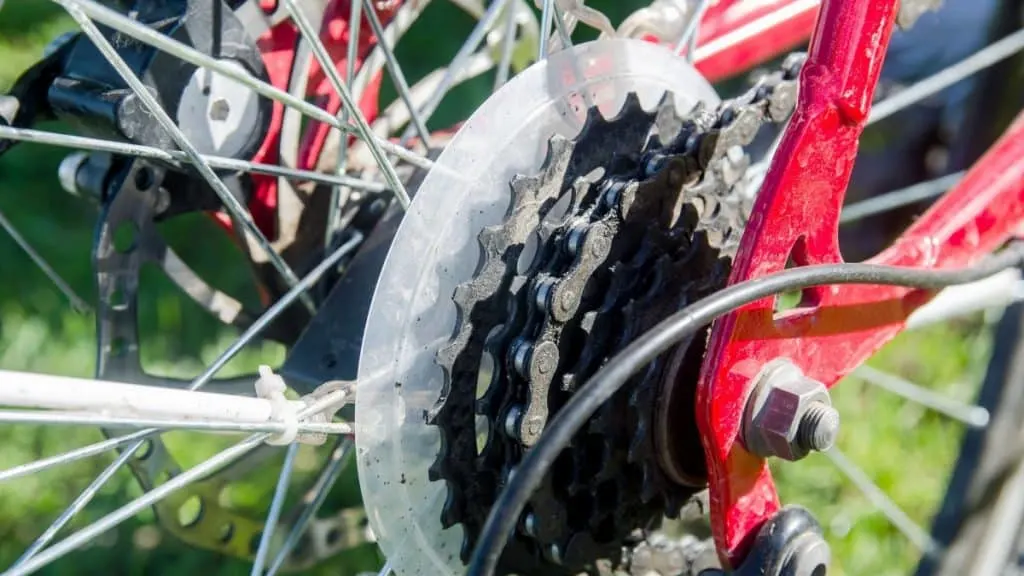
Your bicycle cassette is a cluster of sprockets that are found at the rear of your bike and can have between five and thirteen sprockets. Many people don’t realize that these bike cassettes need to be replaced when worn out to ensure a properly working bicycle. But how often do you need to replace your bike’s cassette?
Bicycles that are used at a normal rate will need a new cassette every few years, but more avid riders will need to replace the cassette each season. Bicycle cassettes can be easily purchased and changed with limited tools. Riders need to ensure they buy the same sprocket cassette as the one removed.
If you haven’t kept track of the last time your cassette was replaced, there are several ways to tell if it needs changing (which we’ll discuss below).
This detailed guide will go through:
- how to tell if your cassette needs replacing
- what can happen if you don’t replace it when necessary
- how you can replace it at home yourself if you find that it needs replacing.
(Note: Some links on this site are part of affiliate programs, where the site owner is compensated for referring traffic and business to the companies)
Understanding Your Bike’s Cassette
Before we jump into checking your bike’s cassette, lets learn a little about:
- what it does
- why it’s important to your overall bike ride
- what can happen if you don’t replace it on time
Your cassette will provide a range of gearing options and is connected directly to your bike’s chain. This range of gears will affect the way you pedal and allow you to shift to new gears, depending on the type of bike that you ride.
The bike cassettes have sprockets that come in varying sizes, with the larger sprockets having more teeth. Most often, the larger sprockets will equal an easier (higher) gear, which reduces the overall torque on your back wheel.
On the other hand, a lower number of sprocket teeth will equal a harder pedal (lower gear), but you will need to pedal less frequently.
You’ll want to take a look at your cassette to see the number of sprockets present, as different bike types will have different cassette options.
TIP: Make sure that you choose the right cassettes for your bike when you are replacing them. They simply won’t fit right or work properly if they are the wrong ones!
How to Tell if your Bike Cassette Needs Replacing
As mentioned, you will want to replace your bike cassette at least once every three years, even if you are not riding super regularly. However, if you are riding your bike a high mileage each year, you will want to change the cassette each season.
TIP: If you are changing your chain as needed and caring for your bike properly, your cassette will often last longer.
If you’re not sure when the last time your bike cassette was changed, it’s recommended that you go ahead and change it. However, here are some signs that you can look for that tell you when it needs changing:
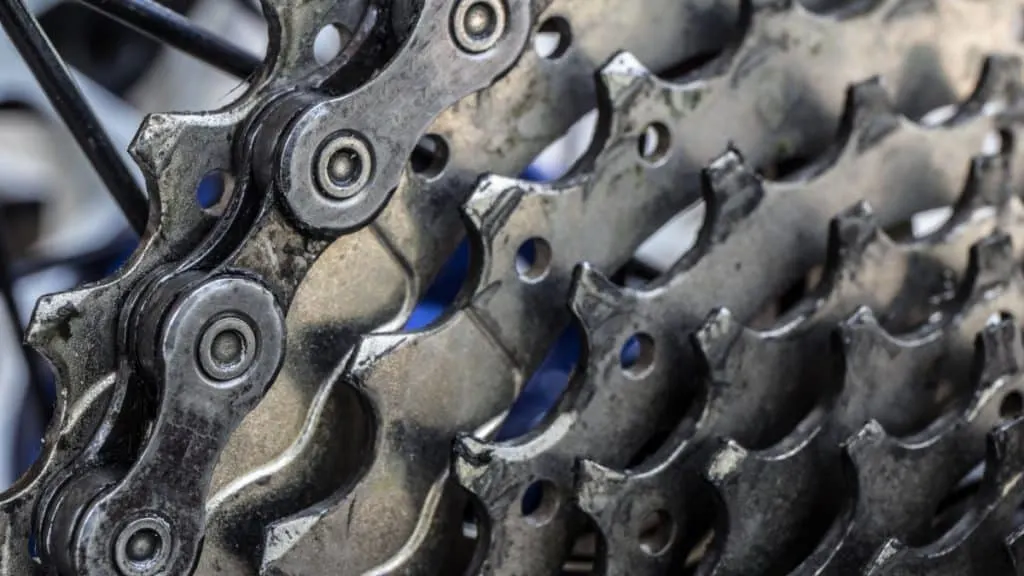
- Start by examining the teeth on one of the sprockets or cogs to see if they appear worn down. This can be challenging if you are new to bike maintenance, but more severe wear will be very noticeable.
- When examining the cogs, you should look at a few differing sprockets. If you tend to ride in a certain gear, you will wear that specific cog down more quickly and others may look normal.
- The cogs that are worn down will be pointy. However, newer teeth will be flatter on top.
- Another sign that your cassette needs replacing is if you are experiencing the chain skipping while pedaling. The first thing you will want to look at is the chain, but a newer chain should not be skipping.
- An easy way to see if the cassette needs changing is to grab the rear brake lever, which holds your wheel tight. Then push down on one of the pedals with the brake held and look for any upward movement of the chain on the cassette. If you see movement, it needs to be replaced.
How Much Does It Cost to Replace a Bike Cassette?

The pricing on your new cassette will vary depending on the type of bike you own. You will find that bike cassettes range from as low as $25 – $30 to even $300 or more. The more expensive and higher end your bike is, the more expensive the cassette will often be as well.
If you can change your cassette at home, you will save money compared to taking it to a shop for these changes. One thing to keep in mind, is that the higher quality cassette you purchase, the better it may perform for you.
However, the biggest factor is that you should always purchase the right cassette for your bike type.
Choosing the Correct Cassette for your Bicycle
There are a few key things you’ll want to keep in mind when choosing your cassette to ensure it will work for your bike:
- Find a cassette that has the same number of cogs that your current cassette has. If you have a nine-speed bike, you must buy a nine-speed cassette, no bigger and no smaller.
- You need to bear in mind the type of bike you have:
- Mountain Bikes – For mountain bikes, you will often find that the cassette range is very important. This is simply because you will need a wider range of gear options than other bikes. Some of the commonly used cassette sprocket ranges for mountain bikes are 11-32, 11-34, and 11-36, but you will want to look at your specific bike cassette.
- Road Bikes – These cassettes have very little difference between the sprockets and are designed for flatter roads. Most manufacturers of road bikes sell them with 12-25 cassettes, which are easy to find and work well. Of course, check your bike for the exact cassette.
How to Replace Your Bike Cassette
When it comes to replacing your bike cassette, it is much more affordable to do on your own, than it is to get someone else to do it.
Of course, if you’re not well versed in bike maintenance, this can be a bit of a challenge. If you believe you cannot complete this work on your own or don’t have the tools on hand, visiting your local bike shop can help.
However, if you have some essential bike tools at home, you can replace your cassette yourself without too much hassle. Here’s a guide on how to do it:
What Tools/Gear you Need to Replace a Bike Cassette
Here’s a list of what tools you’ll need during the replacement. Most of the items are available easily on Amazon. So I’ve linked to them in the list if you wanted to check them out:
- A chain whip tool / cassette pliers
- A lockring tool – This needs to be compatible with your bike as they come in several sizes.
- An adjustable wrench
- A new cassette – Again, as mentioned earlier, this has to be one that fits your bike.
- A new chain – If your chain is newer, you can skip this. Generally speaking, the cassette will need replacing every other time that the chain does.
NOTE: Check out my bike repair tool guide for 21 essential bike repair tools that you’ll need to fix almost any problem on your bike.
A General Guide to Replacing Your Bike Cassette
Thankfully, when it comes to replacing your cassette, most bikes are very similar. Of course, if you have any questions, you may want to consult an expert on the process.
The basic instructions for changing your cassette are:
- Remove the rear wheel. To do this:
- Shift into the smallest cog or gear on your current cassette.
- Open the quick release on your bike.
- You may need to unwind the thru-axle. Then take the wheel out of the bike.
- Loosen the lockring using the lockring tool previously mentioned. To do this:
- Ensure you are getting a tool that fits your brand of cassette.
- The cassette will be held in place by the chain whip. As your lockring unwinds, use a chain whip to counter this motion. Note: It can take a lot of force to remove the lockring.
- Next, remove the lockring from the cassette and pull the cassette towards you.
- This will remove it from the freewheel.
- Most people throw the old cassette away, but you can keep it at this point as a spare for emergencies.
- Grease the freehub lightly. To do this:
- Clean the freehub first if needed and then grease it. Keeping the freehub clean can help the cassette last longer.
- Slide the new cassette into place, make sure it is in order.
- TIP: If you’re every worried you won’t know how to put it back how it was, take a picture before you remove anything!
- Begin lightly tightening the lockring in place.
- Fit it into the front of the cassette and screw it gently back into place. Start by doing it by hand and then use the previously mentioned tool.
- Look up your specific manufacturers specifications and tighten the cassette to this point.
- Tighten to the manufacture recommended torque. Do not overtighten as it can cause damage.
The Benefits of Riding with a New Bike Cassette
Making sure you have a bike cassette that is in good condition will ensure that you:
- Get a much smoother ride.
- You don’t prematurely wear out other parts of your bike, such as the chain.
If you find that your ride isn’t as smooth as it needs to be, it’s worth checking your bike cassette. They need changing at least once every few years, with more frequent riders changing them more often.
Changing your cassette is generally an easy process, but you’ll want to make sure the new cassette you purchase fits your exact bike.