
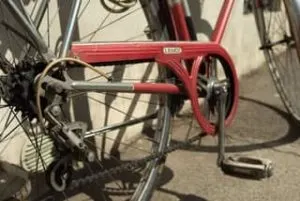
When it comes to bike maintenance, one of the first things that will probably need your attention is your bike chain.
There’s nothing like the horror of going back to your brand new bike after a wet ride a week ago only to see the chain looking like it hasn’t seen the light of day for a month!
Note: Some links on this site are part of affiliate programs, where the site owner is compensated for referring traffic and business to the companies
What Causes the Bike Chain to Rust?
As you ride your bike, grit and all sorts of dirt will be hitting the chain, removing the layer of grease that it has on it.
This is increased when the weather is wet because the water will also be splashing onto it, and any rain will be washing it away, causing the grease to come off further.
Once the grease is no longer on the chain, any moisture that is exposed to the raw chain will cause rusting. This is why your chain rusts a lot quicker when the weather is wet.
It’s completely normal for your bike chain to rust, and it is part and parcel of cycling.
It doesn’t matter how shiny and new your bike is, the chain will need your attention if you want to keep your bike in good working order.
As with most things in life, a little bit of tender loving care will go a long way in keeping your bike in peak condition.
How to Stop Your Bicycle Chain From Rusting…
As they say, prevention is better than cure, and in this case, it’s true.
In order to prevent it from rusting, the best approach is to clean, grease and wipe your bike chain regularly, depending on how often you ride and what conditions you ride in.
The whole process will take a minute or so if done regularly so it really is worth doing to save you from problems later.
Here’s a step by step break down of how to do it:
What you’ll need:
- Old clean rag (or kitchen towel)
- Old newspaper
- Some bike cleaner/degreaser like this one (or plain water)
- Bike lubricant ( I like Muc-off wet lube, which is readily available at Amazon.)
Step 1: Remove the dirt and grease
Put some newspaper down under your bike to catch any mess that may fall.
Spray some bike de-greaser onto the rag (or just plain water, depending on how dirty your chain is).
Hold the rag onto the chain and rotate the peddle through about 3 or 4 rotations. You’ll notice the rag collecting all the old dirt and grit that has stuck to the chain.
Step 2: Dry the chain
Run the rotation through again 3 or 4 times, only this time run a dry clean part of the rag through. Remember, the chain has to be completely dry in order for the chain to be properly lubricated, so this step has to be done very thoroughly.
Step 3: Lubricate
Time to grease! Keep the lube nozzle in one single place on the chain, and rotate your pedals for 3 or 4 rotations while letting the lube slip into chain rings.
The lube will spread into the chain and will also get into your sprockets and derailleur, which will keep the whole system in good working order.
Step 4: Wipe off excess
This is a super important step that many people miss out. Use a clean part of your rag to wipe off the excess grease using the same method as step 1.
Having too much grease on your chain causes it to attract a lot more dirt and grit, causing the lube to come off and the chain to rust even more.
How Often Should I Grease My Bike Chain?
Keep your chain at the right grease level and it will avoid rust for far longer.
As a rule of thumb, when you touch the chain, it should feel like touching a greasy fried chicken take-out meal. Anything greasier or less greasy than that, and you need to either wipe it (step 4) or grease it.
If you’re riding every day in wet conditions, you may need to lube the chain weekly.
And you’ll find that you don’t need to go through these steps too often at all in the summer. You could probably get away with once a month or even less than that.
The best thing is to touch it and feel how greasy it is.
If I’ve been out on a particularly wet or gritty ride, I’ll give my bike chain a good check over to see if it is lubricated enough and that it isn’t looking too grimy and that it is still greased well enough.
The best time to lubricate the chain is just after a ride. That way, the lubricant has had some time to seep into all the bits and pieces well before your next ride.
NOTE: For more guidance on how often you should be to oil your chain, check out my article “How Often to Change Oil on Your Bike Chain”
More Tips on Keeping Your Bike Chain Rust Free…
Aside from the regular chain greasing we’ve just talked about, there are additional things you can do that can help keep your bike chain stay rust free for longer.
Here are a few quick tips…
Keep the Bike Indoors
Keeping the bike indoors will keep it away from the outdoor elements and keep your bike chain in a good rust free condition for far far longer.
==>Check out my article on indoor bike solutions.
If keeping it indoors isn’t an option, which is true for many people including myself, then it is important to keep it away from the wet weather at least.
At the very minimum, invest in a good bike cover if you don’t have any outdoor storage area.
==> Check out outdoor bike storage solutions.
Fit a Chain Guard to the Bike

Anything that keeps the chain protected from wet weather will help prevent rust. Getting a chain guard fitted, even if it is only a partial cover will help keep it protected from grit and water.
Buy a Chain that is less prone to Rust
If you just don’t have the time or inclination to bother with looking after your chain, you may want to invest in a chain that is less prone to rust. (Yes, I said less prone to rust, not rust free, sorry people but life is such!)
Nickel Plated chains tend to be less prone to rusting, and you may decide that this is the best approach for you if it is difficult to get those bike greasing sessions in. They are available at most local bike shops.
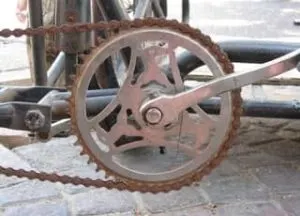
What if your Bike Chain is already Rusty?
This will involve a further step. You must remove the rust first before doing any of the other things.
To do this, use some aluminium foil screwed up into a ball to remove the rust first. Alternatively, some steel wool or a steel wired brush would work too. Then wipe clean, then go through the 4 steps mentioned above.
You may want to buy yourself a brush set such as this one on Amazon. It comes with sprocket cleaners too, which is good for getting into all those hard to reach areas.
If your chain is rusted solid and steel wire isn’t going to cut it, you have some additional steps to think about first.
How to Salvage a Bike Chain that is Rusted Solid…
You’ll have to remove the chain from the bike first and then soak it in some de-greaser or bike cleaner for a few hours.
Take it out and soak it in hot water, and give it a good wipe down. Then repeat this process as many times as it takes to get rid of enough rust.
Then, once your bike chain is completely dried, you can re-attach it and go through the steps above. But be aware a chain that is rusted solid may have additional wear and tear on it in addition to surface rust. And if it is worn out, it may have passed its use by date anyway (see below on how to check if it’s time to replace your chain).
So putting in the time and effort in reviving the chain simply may not be worth it.
Getting a new chain fitted may be a more desirable option, with the intent of taking care of it regularly to keep it lasting.
Bike chains are not too expensive and are widely available. In fact, it’s the most frequently changed part of a bike.
How Often Should I replace my Bicycle Chain?
If you’re riding your bike daily, you will need to replace your chain at least once, probably twice a year.
Over time, the bicycle chain becomes stretched, and the links will no longer be as tight as they need to be to change gears and pedal efficiently anymore.
You can use a chain measuring tool like this one (link to Amazon) to check the laxity of your chain, or if you don’t have one, simply take it to a bike shop to get it checked.

As you can see in the picture, the tool will not go through the link if your chain is still in good shape. If it goes through the link, then it is time to invest in a new chain.
If your bike chain is very old and rusty, it is well worth checking how stretched it is before embarking on a de-rusting project!
Leave a comment