
Whether you are an experienced cyclist or someone who has just gotten into the sport, bicycle brake malfunction and bicycle brake adjustment will inevitably become a regular part of your cycling life. However, even for experienced cyclists, tinkering with bicycle components is foreign territory. Learn how to adjust your bicycle brakes yourself!
Here are the basics to safely adjust or loosen your bicycle brakes.
- Identify the type of brakes your bicycle has and learn how they work.
- Gather the tools you will need.
- Loosen or tighten your bicycle brakes accordingly.
- Test the brakes on your bicycle.
- Re-adjust your bicycle brakes if needed.
- Perform regular maintenance on your bicycle’s brakes.
With these straightforward steps, you will easily be able to keep your bicycle brakes in tip-top shape. However, there are also a lot of details when it comes to tweaking the intricate mechanisms of your bike. Read further for a detailed step-by-step guide on how to adjust your bicycle brakes like a pro!
How to Adjust Your Bicycle’s Brakes
Before adjusting your bicycle brakes in order to maximize your vehicle’s performance, it is of utmost importance that you first understand how a bicycle brake works and how your specific bicycle brake works. Did you know that there are actually four different types of bicycle braking mechanisms?
While some bicycle brakes are easier to adjust, others can be more difficult. Regardless of whether you use a ten-year-old bicycle or a modern one you bought last week, having a thorough understanding of bicycle braking will guarantee a smoother experience.
How Brakes Work
The first step is to identify the type of bicycle brake and how the braking mechanism works. We all know that brakes reduce the speed of any vehicle, but how do they work?
There are three main components of a bicycle brake system:
- A component for the cyclist to apply the brake.
- Another component transmits the signal to the brake.
- The actual brake itself.
An example of each would be:
- Brake levers for the rider to squeeze.
- Cables that tell the brakes to activate.
- A caliper receives the message to squeeze the rim of the wheel and slow the bike down.
Essentially, these three components are what make the brakes work when you ride a bicycle. Brake failure occurs when any one of these three breaks or is in poor condition.
Types of Bicycle Brakes
There is a need to identify which type of brake you have before knowing which steps are needed to adjust your bicycle brakes.
NOTE: There are many types of brakes, so I will only talk about the four most common types:
- Caliper brakes
- Cantilever brakes
- V-brakes
- Disc brakes
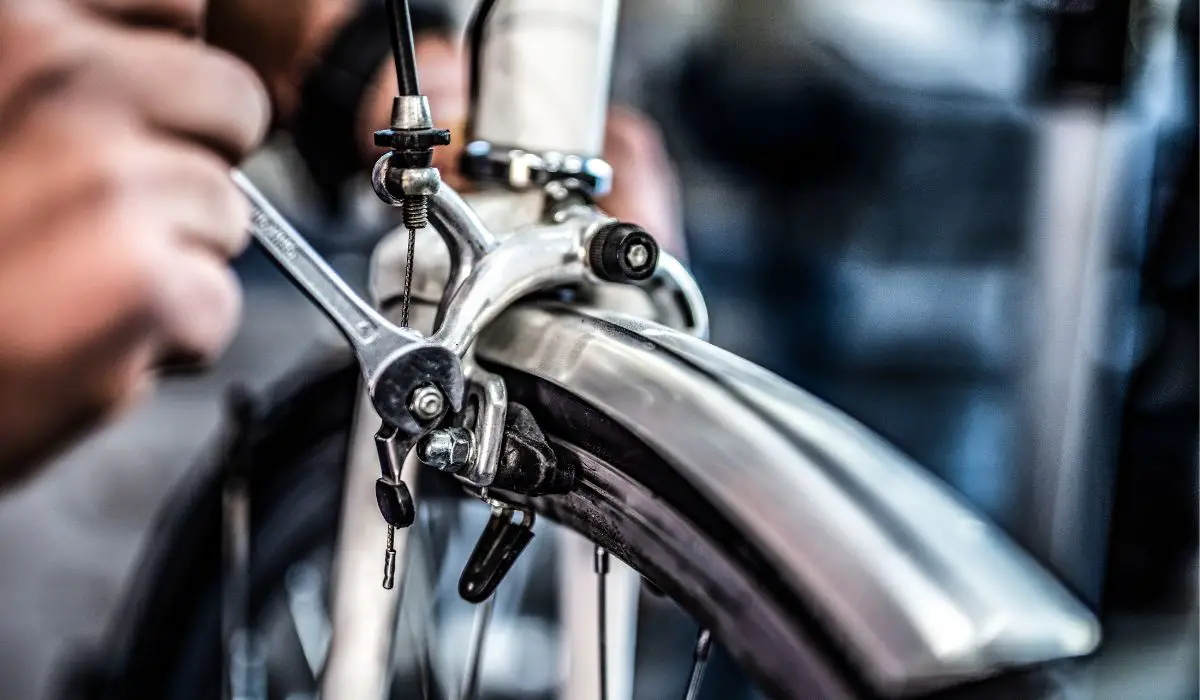
Caliper Brake
This is the most common type of brake, it is secured onto the bicycle frame using bolts. It uses metal friction pads (brake pads) that clamp onto the rim of the wheels to increase the friction between the two surfaces, allowing kinetic energy to dissipate and slow the bike down.
As the name suggests, the brake itself is like a caliper. It works with two brake arms that are activated by a single cable which squeezes them in a “cross manner”, like how scissors work.
Caliper brakes are so common due to their strength and simplicity and are considered to be standard on regular youth bikes and road bikes.
Cantilever Brake
These brakes are much stronger and more durable than caliper brakes, hence they are used primarily in bikes made for cyclo-cross, a form of bicycle racing that requires cyclists to mount and dismount quickly and ride on varying terrain.
Like the caliper brakes, cantilever brakes use brake pads that clamp down on the wheel’s rim. However, the mechanism it uses is different.
Each brake arm is connected to a point on the bicycle frame that is above the brake arms. This point is actually held by another cable connected to the pivot.
The brake activates by contracting the cable between the point and the pivot, which then pulls the cable between the point and brake arms. The pulling action is what clamps the brake arms onto the wheel’s rim.
Appearance-wise, this type of brake is easily recognizable as there are cable attachments that form a triangle-looking shape.
V-Brake
V-brakes are an “evolved” form of the cantilever brake. The brake mechanism works by connecting two brake arms, each with a brake pad, with a horizontal cable.
When the brake receives the message to activate, the cable connecting the two arms is pulled, which brings the two arms closer together. This action is the “clamping action”.
Since the two arms are linear, the mechanical advantage between the force that activates the brake and the force that the brake applies (clamping force) is much higher than the previous two types of brakes.
As a result, they can slow or stop bikes in slippery or rough conditions. Hence, v-brakes are the most suitable for mountain or off-road bikes.
Disc Brake
Disc brakes are very different from the three mentioned above. Instead of being located above the wheel and having brake arms that clamp down onto the wheel’s rim, these brakes are located near and clamp onto a rotor of the wheel.
Hence, disc brakes are the strongest of the four types of brakes. Although strong, they are much more complicated than the other “rim brakes”, since they require a compatible:
- frame
- fork
- rim
- hub
Another difference is that disc brakes do not generate heat in the tires, as rim brakes heat up the tire through friction. Since these brakes are so strong and durable, they are made to handle the roughest and dirtiest cycling conditions.

Tools You Will Need for Brake Adjustment
Before getting started, it is essential that you have the right tools for the job. Although some tools have possible substitutes when it comes to adjusting your bicycle’s brake, the tools listed below are optimal, making your job much, much easier.
#1: Allen Wrenches
Allen wrenches like these sold on Amazon, are the bread and butter for any bike:
- maintenance
- repair
- adjustments
These tools will allow you to both tighten and loosen the bolts and nuts on your bicycle, allowing for freedom when it comes to preferred options.
#2: Open-end Wrenches
Like Allen wrenches, open-end wrenches (Amazon link), are useful for screwing and tightening different nuts and bolts on your bicycle.
These wrenches are usually larger than their counterpart listed above.
#3: Needle-nose Pliers
These pliers found on Amazon, will allow you to firmly grip and secure small parts that you may need to adjust on your bicycle.
They can also help you work on hard-to-reach places that can be unreachable for your fingers and hands.
#4: Rotor Truing Tool
This rotor tool has no substitutes. It is made especially for bicycle brakes and rotor to:
- align
- adjust
- rotate
#5: Latex Gloves
Latex gloves, (sold on Amazon), are strongly recommended when you work on your bicycle brakes.
Not only can the oil on your hands greatly affect bicycle braking capabilities if direct contact is made, but working on your bicycle can be very, very dirty.
Keep your hands clean and free from cuts by wearing gloves.
#6: Denatured Alcohol
This is completely optional. Denatured alcohol allows you to clean bicycle brakes and other similar parts.


Adjusting Caliper Brakes
As stated, caliper brakes are the most common type of brake on any bicycle, so your bicycle will probably have it too! Fortunately, they are also one of the easiest types of brakes to:
- replace
- loosen
- adjust
Below are the steps to take to properly loosen the caliper brakes.
#1: Try the Barrel Adjuster
Before busting out your tools, it is a good idea to check for a barrel adjuster on your bicycle. Some bicycles have them, some do not.
Usually, the barrel adjuster is located above the brake lever on your brake cable. From your handlebar, follow the brake cable and you should be able to spot it.
With the barrel adjuster, you can tighten or loosen bike brakes. Try tweaking around with this contraption and testing its effects on your bicycle performance.
NOTE: In some cases, this adjustment is sufficient for brake adjustment. If not, proceed to step two.
#2: Locate the Brake Bolt
This bolt can be located quite easily. Again, follow the bicycle brake to the location where the brake is connected to your bicycle frame as a whole. From there, you should be able to spot the bolt.
#3: Tighten or Loosen the Bolt
With this bolt, you can both tighten and loosen bicycle brakes. If your bicycle brakes are too loose, you’ll have to exhaustingly squeeze the brakes on the handlebars in order for them to engage.
Here’s what to do: First, hold down your bicycle brakes and simultaneously proceed to tighten the bolt in a way that it is both secured and centered.
If your brakes are too tight, proceed similarly. Hold down your bike brakes and simultaneously proceed to loosen the bolt. Ensure that it remains centered and that it is not too loose.
Test this by taking your bicycle out for a quick ride, and pay attention to your bicycle brakes! If the bicycle brake bolt is too loose, your entire brake mechanism may shift when you ride or when you engage the brakes.
#4: Adjust the Brake Cables
If needed, you can also proceed to slightly tighten the bicycle brake cables. Do not worry! It is quite simple.
With an Allen key, slowly loosen the bolt and the nut that is located at the ends of the cable. Then, you can allow extra cable through the contraption accordingly.
IMPORTANT: Do not forget to retighten the nut and the bolt before giving your bicycle a test ride.
Similarly, you can loosen the nut and the bolt at the ends of the cable and retract a small length of cable into the contraption.
In this case, you must also ensure that your bicycle brakes are not exceedingly loose. Use the same method as stated above to test this.
#5: Adjust Bicycle Pads
As stated above, you can also use the barrel adjuster to tighten or loosen your bicycle pads. When you feel that the bicycle pads are in a good place (they should be tightly planted near your bicycle rim) you can either loosen or tighten the bolt that keeps your bicycle pads in place.
For the bicycle pads, do not worry too much about over-loosening the contraption. The bicycle rim should be sufficient in securing your bicycle pads.


Adjusting Cantilever Brakes
If you have a slightly older bicycle, you may still use cantilever brakes which were more common some time ago. Unfortunately, the cantilever brakes may be the hardest type of brake to adjust by yourself.
Why? The brakes must be secured and placed perfectly, otherwise, you may experience issues such as brake chatter and brake jamming. Below are the steps to take to properly loosen your cantilever brakes.
#1: Adjust the Pads and Cables
The method to adjust cantilever brakes on a bicycle is almost identical to the instructions above given for caliper brakes.
With an Allen key, slowly loosen the bolt and nut located at the ends of the brake cables. From here, you can either let extra cable through or retract some cable to loosen or tighten your brake respectively.
#2: Test the Bicycle
This is the most important and difficult step when it comes to adjusting cantilever brakes. The difficulty of adjusting cantilever brakes arises when it comes to balancing the contraption.
When adjusting cantilever brakes, you must make adjustments in small increments at a time. You must be patient and properly test the brakes after every adjustment to ensure that it is perfectly balanced so that they can function optimally during rides.
Adjusting your Bicycle’s Disc Brake
The disc brakes that are found on mountain bikes and road bikes are quite different than the other braking contraptions. However, it is actually arguably the simplest type to make adjustments to.
Below are the steps to take to properly loosen disc brakes.
#1: Locate the Brake Bolts
These bolts can be easily spotted directly on the disc brake on the bicycle. The bolts are mounted for the purpose of securing the disc brake to the frame of the bicycle.
#2: Center the Rotor
Loosen the brakes by slightly loosening the bolts. Then, engage the brakes so that the rotor is activated.
This will center the rotor and loosen the brakes to an extent that will provide you comfort when riding and braking.
#3: Retighten the Brake Bolts
Keep your brakes engaged and the mechanism open. Then, retighten the bolts.
#4: Test the Brakes
Take your bicycle out for a test run. Take it slow and pay attention to the brakes. In some cases, the disc brake may be improperly attached or still too tight. If that is the case, proceed to the next step.
#5: Set Up the Bicycle
First set the bike in such a position that will allow the wheels to spin freely. This can be achieved with two different methods.
Consider investing in or using a bicycle stand. This way, the bicycle be held off the ground and secured in a position that is stable, making it easier to do maintenance or adjustments.
Otherwise, consider flipping the bicycle upside down so that the wheels are pointing straight up, allowing them to spin freely.
#6: Check the Brakes
Inspect the bicycle and check if the disc brakes are either unstable (wobbly or loose) or imbalanced (large opening and closing gaps between your bicycle brake pads).
This allows you to identify whether or not your rotor is out of true. Rotate the part of the bicycle brake mechanism that requires truing away from the caliper of your bicycle.
#7: Use the Rotor Straightening Tool/Rotor Truing Fork
Gently rotate the tool around the rotor of the bicycle in order to straighten the part of the brake mechanism that is either unstable or imbalanced.
This step requires extensive patience and care. Bicycle brake pads and brake mechanisms can be extremely fragile. Take your time and use the tool gently.
#8: Inspect the Brake Pads
From the top or back of the brake, inspect the bicycle brake pads’ side profile. You should be able to see a spring that secures the bicycle brake pads together.
There are three things you should be looking out for at this time:
- The spring is extremely close to the rotor of your bicycle.
- You cannot see the brake pads.
- The pistons on your bicycle extend too far out.
If any of the three circumstances listed above apply to your bicycle, the brake pads need immediate replacement.
#9: Replace the Brake Pads
Locate a pin in order to undo the bicycle brake pads. This should be easy to locate on the brake pads. Undoing it allows the brake mechanism to remain intact on your bicycle. Remove the brake pads from the top of the brake mechanism.
After repining and reinstalling the new bicycle brake pads onto the bicycle, push the extended pistons back. This can be done using the flat area of a large, wide flathead screwdriver.
Doing this gives the new bicycle brake pads room to avoid any rubbing in the future.

When and Why You Need to Adjust Bicycle Brakes
Sometimes, the brakes break. Then, not only do you have to adjust them, you need to replace them. However, you should adjust your brakes routinely to help the performance and safety of the bike.
NOTE: When referring to the adjustment of bicycle brakes, not only is the actual brake mechanism itself being adjusted but the brake pads and brake cables too.
There are several signals that suggest you should adjust your brakes. If you hear squeaking when you brake, it may be because the brake pads are wearing out.
If your brakes seem to be less effective, or your brakes do not slow the bike down as much as usual, you may need to adjust the:
- brake pads
- brake arms
- cables
Also, if your bike wheels seem to be “stuck”, the brake pads may be rubbing against the rim of the wheels or rotor.
Of course, safety is one thing, but maintaining a well-conditioned bike requires routine adjustments. Adjusting the brakes requires a quick check of the condition of the bike.
During this time, it is easy to clean the areas that are harder to reach or change brake components if needed.
Brake cables that seem too loose or tight may not necessarily be a safety hazard but may hinder your performance or comfort.
Extra Tips for Bicycle Brake Maintenance
Aside from tightening or loosening the bicycle brakes, it is essential that you conduct regular maintenance on the braking mechanism. This will ensure that your bicycle is in tip-top shape and that it performs optimally under any circumstance, even through a rainy day or a muddy route.
Here are some tips for conducting regular maintenance on your bicycle brakes.
Tip #1:
As you did in the above adjustments, either use a bicycle stand to secure your bicycle off the ground or flip it on its back. In doing so, your bicycle wheel should immediately stop as soon as you engage the brakes.
If this is not the case, you may want to either inspect and adjust your bicycle brake yourself or consider bringing it to a bicycle mechanic.
Tip #2:
Inspect your bicycle brake pads. They should be able to naturally make contact with the sides of the rim simultaneously.
They should also be balanced and equal on each side. If your braking pads make a scraping sound when in use or if they feel “sticky”, it is strongly recommended that you get a replacement soon.
Tip #3:
Check the part of your bicycle rim that makes constant contact with the brake. If there is any damage to this part that may significantly impact your cycling experience or performance, bring your bicycle to a mechanic.
Tip #4:
Check the braking levers on your handlebars. You should be able to easily engage the lever, and it should easily retract as well.
If the contraption feels “sticky” in that it cannot be crisply fully pressed, then it may be time to consider replacing or changing the braking mechanism.
Tip #5:
When performing maintenance on your bike brakes, avoid making direct contact with your brake pads with your fingers or your skin in general.
The oil that builds up on the surface of your skin can greatly diminish your braking capabilities and performance since it creates a more “slippery” surface for your brakes.
Tip #6:
When dismantling or replacing parts of the brake mechanism, always change a singular brake at a time, especially if you are a beginner.
Do not dismantle both brakes at the same time. Keeping one brake in normal condition will allow you to reference it if you ever get lost or confused about the mechanisms and appearance.
Tip #7:
Likewise, do not ever engage your brakes from your handlebars if you dismantle or remove your braking mechanism from your bicycle.
This will forcefully push the brake pads extremely tightly together. If this occurs, the reinstallation of brakes onto your bicycle will become a much more difficult job. You must first separate the pads, which will not be easy.
Tip #8:
If you see that your brake pads are glazed or extremely smooth, use sandpaper to create a rougher texture, which can increase performance and efficiency
Tip #9:
When you plan on changing, cleaning, or conducting any sort of maintenance that requires the adjustment of the brake pads, securing down the brake levers on your handlebars with rubber bands makes the job much easier.


Final Thoughts
Of the many parts that go into building a working, well-performing bicycle, the brakes are undeniably one of the most important parts. Why?
- It ensures your safety.
- It allows you to fully and easily control your bicycle at any given time, preventing any possible accidents or mishaps.
Likewise, when participating in such a sport, whether competitively or casually, safety should be your number one priority. That is exactly why you should regularly perform maintenance on your bicycle’s brakes, especially adjusting them when need be.
It is essential that you regularly check the condition of your brakes, regardless of whether you use:
- caliper brakes
- cantilever brakes
- V-brakes or disc brakes
In understanding the function of your brakes and how to adjust them to suit your cycling, you are not only ensuring your safety, but you are also guaranteeing yourself a more enjoyable experience!
You might also be interested in: